Table of Contents
Ever wondered how to create a talking AI-avatar? In this tutorial, I’ll show you how to do it step by step, completely free of charge. Whether you’re looking to bring your characters to life or make engaging videos, this guide will help you get started effortlessly!
AI-TOOLS I USE👇
📌TEXT TO VOICE: https://try.elevenlabs.io/q3vpavcah1tg
📌PROOFREADING: https://trinkaai.pxf.io/c/6001249/2105541/26632
Let me take you through the fascinating process of creating visuals and videos with AI and also talking AI-avatars.
If you’re ready, let’s dive into the details. By the way, if you’re wondering how I escaped from those dinosaurs, I covered that in a different post: Free Image to Video AI Tool
Step 1: Logging into ArtFlow
First, log in to ArtFlow. Once inside, you’ll see the character we created earlier. Navigate to the “Video Studio” section. If you haven’t created a character yet, don’t worry. I’ve got you covered! Create FREE AI-Character
ArtFlow Website: https://app.artflow.ai/
Step 2: Choosing Themes and Scenes
ArtFlow offers a variety of themes for your projects. You can pick one that suits your vision or use scenes you’ve created previously. In this tutorial, I’ll use a scene I’ve already created to make my character talk.
Once you select a theme, a new tab opens, where you’ll find a range of characters and scenes offered by ArtFlow, along with any characters you’ve already created.
Step 3: Exploring the Features
ArtFlow isn’t just about creating static characters. It identifies the face of your character and syncs the mouth movements to match the speech. On top of that, you can:
![]()
- Add effects to enhance the scene.
- Pan the camera left or right for dynamic visuals.
- Zoom in or out for a polished cinematic experience.
Want more customization? Use filters to adjust colors, create vibrant visuals, or even a black-and-white atmosphere.
Step 4: Using Ready-Made or Custom Characters
ArtFlow provides a library of ready-made characters you can use. Alternatively, you can upload your own custom designs to personalize your projects.
Step 5: Adding Dialogue
This is where the magic happens! Click on the “Dialogue” section. A text box appears where you can input the dialogue for your character. On the side, you’ll find voice artist options in various languages.
ArtFlow offers free and paid plans. Since I’m using the free plan, I selected a young female voice from the options. You can preview the voice to ensure it fits your character.
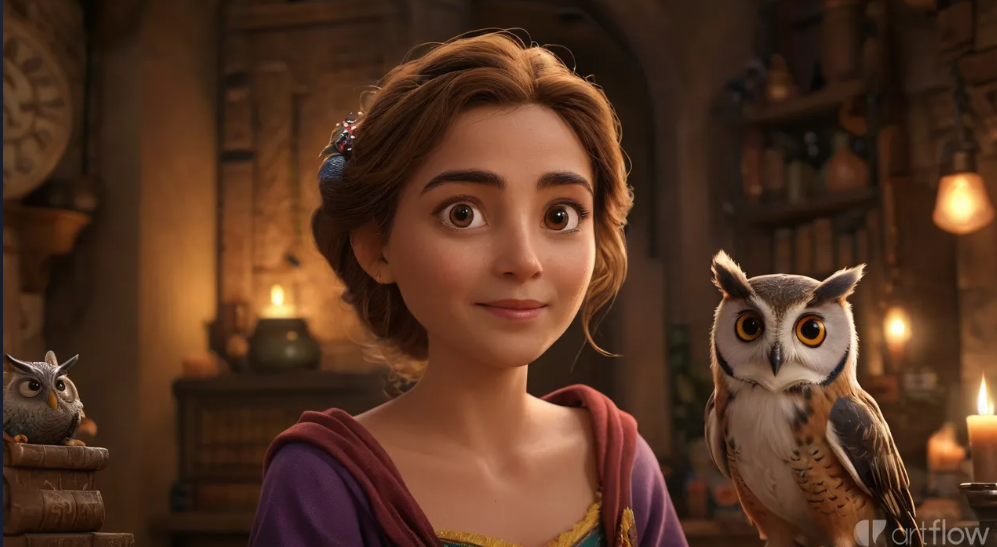
For instance, I entered: “Hello, my name is Olivia. This is my friend, the owl.”
Of course, you can also use other languages. ArtFlow supports high-quality voiceovers for multiple languages.
Step 6: Exporting Your Video
After entering the dialogue and selecting the voice, it’s time to export the video. Name your project (I named mine “Olivia”) and let ArtFlow do its magic.
The video creation process only takes a few minutes, which is much faster than the 3-4 hours it used to take for character creation! The time may vary depending on the length of your dialogue, but it’s impressively quick.
The Results
Once your video is ready, you can check if the facial expressions and movements look natural. If you’re satisfied, share it across your social media platforms!
Creating AI-powered animations has never been easier. Whether you want to make presentations, craft short films, or launch a cartoon channel, ArtFlow is a fantastic tool to bring your ideas to life.